
Minecraft Castle Tutorial: How I Finally Built the Castle I’d Been Dreaming About
I’ll be honest — my first castle looked like a prison block with towers stapled to the corners. I had big plans, a terrible execution, and way too little stone. Sound familiar? After dozens of failed attempts, restarts, and one very unfortunate lava incident, I finally cracked the code on building something that actually looks like a real castle in Minecraft.
Whether you’re a beginner who just figured out how to craft a crafting table, or an intermediate player who’s built a few houses but wants to level up dramatically — this minecraft castle tutorial is for you. No fluff, no complicated redstone setups. Just real building advice from someone who’s spent way too many hours on this.
Why Build a Castle in Minecraft?
Beyond the obvious “it looks awesome” reason, a castle is one of those builds that genuinely changes how you play the game. In survival mode, a well-designed castle gives you storage rooms, crafting stations, a bed, an enchanting setup, and defensible walls — all in one place. It’s a base that actually functions like one.
There’s also something weirdly satisfying about standing on a high tower and looking out over land you’ve shaped. Mojang Studios built this game around creativity and survival, and a castle hits both of those in the best way. It’s a project that can grow with you. You add a wing here, a dungeon there, a stable out back — and suddenly you’ve spent three weekends on something genuinely impressive.
Choosing the Best Location
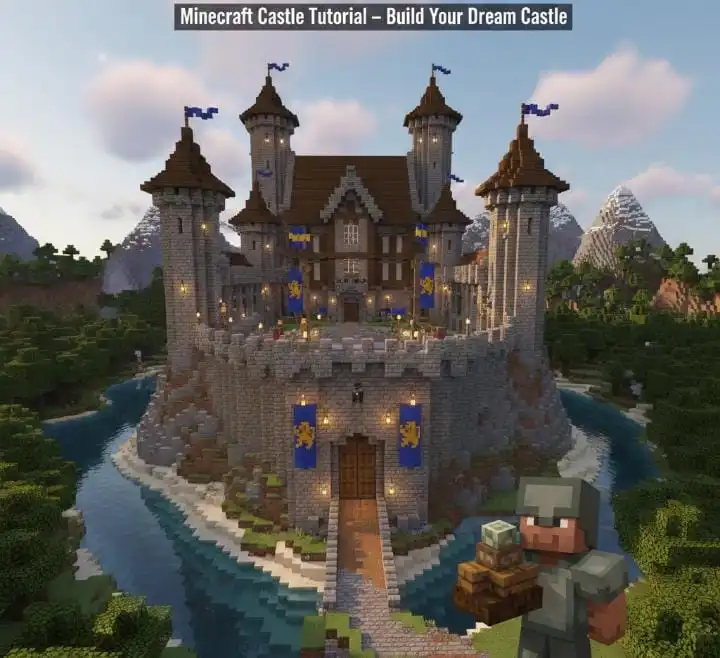
Location can make or break a minecraft castle build before you place a single block. I learned this the hard way after building a massive structure in a flat plains biome and realizing it looked like a sand castle at low tide — no drama, no character.
Here’s what actually works:
Hilltops are your best friend. Elevation gives your castle natural drama and makes the walls look taller without requiring extra blocks. If you find a hill with a flat top, mark it immediately.
Cliffs near water create that classic medieval aesthetic. A castle overlooking a river or ocean looks stunning and feels like it belongs there.
Forest edges work surprisingly well if you clear the trees in a perimeter around the castle. It also gives you immediate access to wood, which you’ll need for scaffolding and interior touches.
Avoid building in swamps (the color palette kills the vibe), dense jungles (clearing them is exhausting), and deep valleys (the walls get hidden).
Planning the Castle Design
Don’t skip this step. Seriously. Every time I jumped straight into building without planning, I ended up tearing things down halfway through.
Start with a footprint. Use dirt or any cheap block to mark the outer walls on the ground before you commit to anything permanent. A basic minecraft castle design could be as simple as a rectangle with a tower at each corner. That’s a fully functional starting point.
Decide on scale early. Bigger isn’t always better, especially in survival. A 40×40 block outer wall is manageable. A 100×100 castle sounds cool until you realize you need to fill it with something.
Think about what you want inside: a great hall, bedrooms, a kitchen (decorative but fun), a dungeon, a treasury, stables, a garden. Pick three or four interior spaces to start and build outward from there.
Best Materials to Use
Material choice defines the entire mood of your castle. Here’s what actually looks good versus what players reach for by default:
Stone Bricks — the classic choice for a reason. Clean, medieval, available in regular, mossy, cracked, and chiseled variants. Mixing these three or four textures on the same wall instantly makes it look less flat and more realistic.
Cobblestone — great for lower walls and foundations. It reads as rougher and older, which suits the bottom of walls perfectly.
Deepslate and Deepslate Bricks — if you’re building a darker, more gothic castle, these are incredible. Darker tone, different texture, and the cobbled deepslate variant works beautifully for accents.
Andesite — underrated for castles. It has a cooler grey tone than regular stone and blends nicely.
Dark Oak Wood — interior beams, gates, doors, and drawbridge details. Avoid birch inside a castle; it reads as too modern and bright.
Blackstone — incredible for accent walls, arrow slits, and any detail work where you want contrast.
Avoid using only one material. That’s the single fastest way to make a castle look flat and boring. Variation is everything.
Step-by-Step Minecraft Castle Tutorial
Step 1: Lay the Foundation Mark your outer wall perimeter with dirt first. Once you’re happy with the shape and size, replace it with stone bricks. The outer wall should be at least 8–10 blocks tall and 2–3 blocks thick. Thick walls look more authentic and give you room to add details.
Step 2: Build the Corner Towers Towers should extend 4–6 blocks above the main wall height. Use a circular or octagonal shape rather than a square — it immediately looks more professional. Add battlements (merlons) along the top using stone brick slabs and stairs.
Step 3: Add the Gatehouse This is the front entrance and one of the most important visual elements. Build two flanking towers with an archway between them. Add an iron portcullis using iron bars — it’s a simple trick but looks incredibly authentic.
Step 4: Build Interior Structures Start with the Great Hall — a long, tall building along the back of the courtyard. Give it a high ceiling (10–12 blocks minimum), large windows using glass panes, and a fireplace using netherrack or campfires.
Step 5: Add Wall Walkways Connect all your towers with walkways along the top of the outer walls. Add trapdoors or stairs to access them from ground level. This makes the castle feel functional and complete.
Step 6: Detail the Exterior Add window openings, hanging banners in your chosen color, vines for an aged look, and stone brick stairs as decorative ledges. Little touches here add up fast.
Survival Mode Tips
Building a minecraft survival castle is genuinely challenging on resources. Here’s what keeps it from becoming a nightmare:
Mine stone in bulk before you start. I usually aim for at least 2,000–3,000 stone blocks minimum before placing anything. Smelt them into stone bricks in batches using multiple furnaces.
Set up a villager trading system early. Mason villagers trade stone bricks, which can supplement your mining significantly without grinding constantly.
Build in sections, not all at once. Complete one wall, one tower, one room at a time. It keeps motivation up and lets you use the space while you’re still building.
Use scaffolding for elevated work — it’s one of the most underrated blocks Mojang Studios added to the game. It makes working at height so much faster and safer than pillaring up with dirt.
Common Mistakes to Avoid
Building too flat — add depth to walls by offsetting sections by one block. It creates shadows and makes everything look more three-dimensional.
Ignoring the roof — flat roofs on towers look unfinished. Use stairs to create pointed or peaked roofs. It takes maybe twenty extra blocks and makes an enormous visual difference.
Using only one block type — already mentioned this, but it’s worth repeating because it’s the most common mistake by far.
Making the entrance too small — your gatehouse and main doors should feel grand. A tiny door on a massive castle looks absurd and breaks the immersion completely.
Forgetting lighting — unlit castles look flat in screenshots and are dangerous in survival. Use wall-mounted lanterns, torches behind trapdoors, or sea lanterns hidden in the floor.
Creative Ideas to Improve Your Castle
Once the main structure is done, this is where you can really have fun:
- Add a moat using water or lava (lava moats look terrifying and incredible)
- Build an underground dungeon beneath the courtyard with iron bar cells
- Create a garden in a corner of the courtyard using flower pots, grass paths, and hedges made from leaf blocks
- Add a stable along one inner wall with hay bales, fences, and a few horses
- Build a blacksmith’s forge as a separate small building inside the walls
- Use armor stands with gear to create decorative knights standing guard in the great hall
Final Thoughts
A castle build is one of those things that starts as a weekend project and quietly becomes one of the best things you’ve ever made in the game. Don’t stress about it being perfect from the start — mine definitely wasn’t. The first version of anything is just the prototype.
Go in with a rough plan, gather more resources than you think you need, and build one section at a time. Before long, you’ll have something you actually want to show people — and that’s what building in Minecraft is really about.
Now get out there and build something ridiculous. You’ve got enough stone.